


Static Site Contact Form: One HTML Form for Any Host
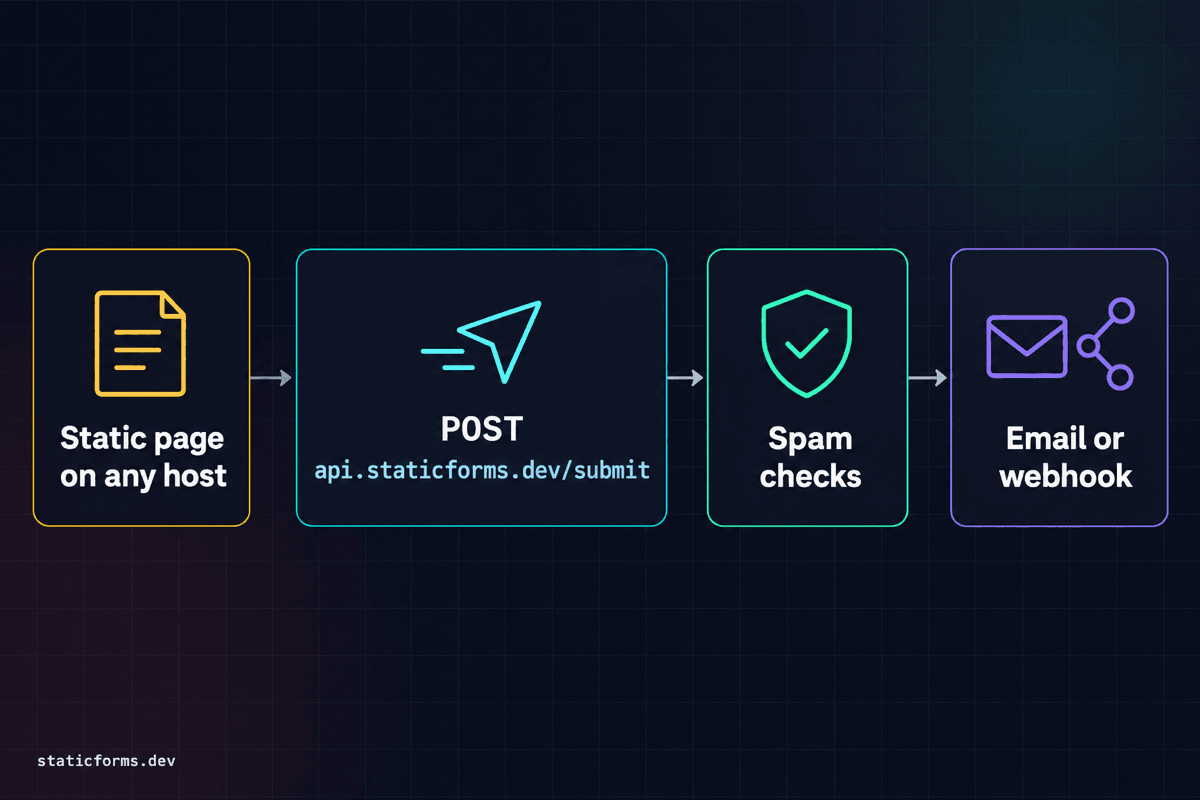
The simplest way to add a contact form to a static site is to point a plain HTML form at a form backend. Set the form's action to https://api.staticforms.dev/submit, add your API key in a hidden apiKey field, and publish. Each submission arrives by email. You don't need a server, a build step or JavaScript.
The same snippet works on GitHub Pages, Netlify, Vercel and Cloudflare Pages, because the host only serves the file. Two things differ by host, and both are easy to get wrong: the address you put in redirectTo, and where your Content Security Policy lives if you have one. Below you'll find the form, a table of those per-host details, and a three-step test that proves a message reaches your inbox.
We make Static Forms (staticforms.dev), so the examples use it. New to the idea? Read what a static form is first.
Using a framework? The Static Forms examples repo has a ready-to-deploy contact form for 13 frameworks, including Next.js, Nuxt, React, Vue, SvelteKit, Astro, Angular, React Router, SolidStart, Qwik, Gatsby, Eleventy and plain HTML. Each one has a one-click Deploy to Vercel button.
Why a static site can't handle a form on its own
A static host serves files. When a visitor presses Send, the browser makes a POST request to whatever URL is in the form's action, and a file server has nothing listening for it.
Something has to receive that request, check it for spam, and turn it into an email. You can write that yourself as a serverless function with an email provider, or you can post to a form endpoint that already does it. For a contact form, the endpoint is usually less to maintain: there's no function to deploy and no email credentials in your project.
Prerequisites
- A static site on any host, or a single HTML file you can publish.
- A free Static Forms account. The Free plan covers one form and 250 submissions every 30 days.
- Your form's API key, from the General tab of the form in the dashboard.
Step 1: Paste the contact form
Put this form in your contact page and replace YOUR_API_KEY with your key:
<form action="https://api.staticforms.dev/submit" method="POST">
  <input type="hidden" name="apiKey" value="YOUR_API_KEY">
  <input type="hidden" name="redirectTo" value="https://example.com/thank-you.html">
  <input type="hidden" name="subject" value="New message from example.com">

  <label for="name">Name</label>
  <input type="text" id="name" name="name" required>

  <label for="email">Email</label>
  <input type="email" id="email" name="email" required>

  <label for="message">Message</label>
  <textarea id="message" name="message" rows="5" required></textarea>

  <!-- Honeypot: hidden from people, filled in by bots -->
  <input type="text" name="honeypot" style="display:none" tabindex="-1" autocomplete="off">

  <button type="submit">Send message</button>
</form>
Every field with a name shows up in the notification email, so add phone or company the same way. These fields have special meanings:
| Field | What it does |
|---|---|
apiKey |
Required. Tells Static Forms which form the submission belongs to. |
email |
Becomes the reply-to address, so you can answer by replying to the notification. |
replyTo |
Optional. A reply-to address that wins over email. |
subject |
Optional. The subject line of the notification email. |
redirectTo |
Optional. A full http:// or https:// URL to send the visitor to after a successful submission. |
honeypot |
Any field whose name contains "honeypot". Keep it hidden; a submission that fills it in is treated as spam. |
The API key is visible in your page source, and that's expected. It identifies the form; it can't read your submissions or sign in to your account. The API reference lists every parameter.
Step 2: Add a thank-you page
With redirectTo, a successful submission answers with a 303 redirect to that URL. Two details catch people out:
- It must be an absolute URL. A relative path such as
/thanksis ignored, and the visitor sees a plain "Form submitted successfully" page instead. - The page has to exist. Create
thank-you.html(or whatever you named it) and deploy it with the rest of the site.
If you'd rather keep the visitor on the same page, submit with fetch and leave redirectTo out. The HTML guide has that version.
Per-host notes: GitHub Pages, Netlify, Vercel and Cloudflare Pages
The form itself doesn't change between hosts. These are the parts that do:
| Host | redirectTo address |
Where a CSP lives | Watch out for | Guide |
|---|---|---|---|---|
| GitHub Pages | https://USERNAME.github.io/REPO/thank-you.html for a project site; https://USERNAME.github.io/thank-you.html for a user or organization site; or your custom domain |
A <meta http-equiv="Content-Security-Policy"> tag in your HTML, if you added one |
Project sites live under /REPO/, so a URL without it points at a page that doesn't exist |
GitHub Pages contact form |
| Netlify | Your *.netlify.app address or custom domain |
A _headers file in the publish directory, or [[headers]] in netlify.toml |
Leave out the netlify and data-netlify attributes. They opt the form into Netlify Forms, which processes it at build time |
Netlify guide |
| Vercel | Your *.vercel.app address or custom domain |
headers in vercel.json, or your framework's header config |
If you read the key from a NEXT_PUBLIC_ variable, it's inlined at build time, so redeploy after changing it |
Vercel contact form |
| Cloudflare Pages | Your *.pages.dev address or custom domain |
A _headers file in the build output directory |
If your framework copies files from public/ or static/, put _headers there so it reaches the output |
Cloudflare Pages contact form |
The header-file locations and the Netlify attribute behaviour come from Netlify, Vercel and Cloudflare documentation, checked 28 October 2026.
If your site sends a Content Security Policy
If your site sends no CSP, or its CSP has no form-action directive, there's nothing to do. form-action has no default-src fallback, so without it the browser lets the form post anywhere.
If your policy does include form-action, add the Static Forms origin to it:
Content-Security-Policy: default-src 'self'; form-action 'self' https://api.staticforms.devKeep 'self' there. MDN notes browsers have disagreed on whether form-action also applies to the redirect after a submission: Chrome blocked a disallowed redirect where Firefox didn't. With 'self' in the list, a redirectTo page on your own domain is allowed in every browser.
Merge the directive into the policy you already ship rather than replacing it with this short example. A blocked form shows a form-action error in the console and no request in the Network panel. The Cloudflare Pages contact form guide shows a form-action policy in a _headers file.
Step 3: Test it in three steps
Run this on the deployed site, not only on localhost, because the host's headers and URLs are part of what you're testing:
- Submit. Open the live contact page, fill in every field with an email address you can read, and press Send.
- Check where you land. You should reach your
redirectTopage. A plain "Form submitted successfully" page means the submission worked butredirectTowas missing or relative. An error page tells you the reason: the troubleshooting table maps each one to a fix. - Check the inbox, then the Inbox. The notification should reach your email. If it doesn't, open the form's Inbox in the dashboard. A submission listed there means the form works and the problem is delivery, so check your spam folder and email delivery. Nothing listed means the request never arrived (unless the spam filter or honeypot caught it), so go back to the browser console.
Then reply to the notification once. The reply should go to the address you typed in the form, which confirms the email field is named correctly.
Keep spam out
Every plan includes the built-in spam filter and the honeypot field from Step 1. For more, add a CAPTCHA: turn it on in your form's security settings, then add the widget.
reCAPTCHA v2 works on the Free plan:
<!DOCTYPE html>
<html lang="en">
<head>
  <meta charset="UTF-8">
  <title>Contact</title>
  <script src="https://www.google.com/recaptcha/api.js" async defer></script>
</head>
<body>
  <form action="https://api.staticforms.dev/submit" method="POST">
    <input type="hidden" name="apiKey" value="YOUR_API_KEY">
    <label for="email">Email</label>
    <input type="email" id="email" name="email" required>
    <label for="message">Message</label>
    <textarea id="message" name="message" required></textarea>
    <div class="g-recaptcha" data-sitekey="YOUR_RECAPTCHA_SITE_KEY"></div>
    <button type="submit">Send message</button>
  </form>
</body>
</html>
Cloudflare Turnstile, hCaptcha and ALTCHA are (Starter and up). Once a CAPTCHA is on, a submission without a valid token is rejected with a 403, so add the widget before you switch it on. Our reCAPTCHA guide explains the keys, and you can also limit which sites may submit with domain restriction (Starter and up).
File attachments
To accept files, add enctype="multipart/form-data" to the form and a file input. File uploads are (Starter and up); on the Free plan a submission with a file is rejected with a 400.
<!DOCTYPE html>
<html lang="en">
<head>
  <meta charset="UTF-8">
  <title>Send a file</title>
</head>
<body>
  <form action="https://api.staticforms.dev/submit" method="POST" enctype="multipart/form-data">
    <input type="hidden" name="apiKey" value="YOUR_API_KEY">
    <label for="email">Email</label>
    <input type="email" id="email" name="email" required>
    <label for="attachment">File</label>
    <input type="file" id="attachment" name="attachment" accept=".pdf,.doc,.docx">
    <button type="submit">Send</button>
  </form>
</body>
</html>
The file uploads docs cover the size limit.
Static site generators and frameworks
The form is plain HTML, so Hugo, Jekyll, Eleventy and Gatsby templates can include it as is. For framework-specific versions:
- Using Static Forms with Next.js
- Using Static Forms with Nuxt.js
- Hugo contact form tutorial
- Jekyll contact form on GitHub Pages
- Contact form on a static WordPress site (Simply Static, WP2Static and other exporters)
Complete Working Example
A full contact page with styling, the honeypot and a thank-you redirect. Save it as contact.html, replace the key and the redirectTo address with your host's, and deploy it next to a thank-you.html:
<!DOCTYPE html>
<html lang="en">
<head>
  <meta charset="UTF-8">
  <meta name="viewport" content="width=device-width, initial-scale=1.0">
  <title>Contact Us</title>
  <style>
    body {
      font-family: system-ui, -apple-system, sans-serif;
      margin: 0;
      padding: 2rem 1rem;
    }
    .contact-form {
      max-width: 600px;
      margin: 0 auto;
      padding: 2rem;
      border-radius: 8px;
      box-shadow: 0 4px 6px rgba(0, 0, 0, 0.1);
    }
    .form-group {
      margin-bottom: 1.5rem;
    }
    label {
      display: block;
      margin-bottom: 0.25rem;
      font-weight: 600;
    }
    .form-control {
      display: block;
      width: 100%;
      box-sizing: border-box;
      padding: 0.75rem;
      border: 1px solid #ccc;
      border-radius: 4px;
      font-size: 1rem;
    }
    .submit-btn {
      padding: 0.75rem 1.5rem;
      background-color: #2563eb;
      color: #fff;
      border: none;
      border-radius: 4px;
      cursor: pointer;
      font-size: 1rem;
    }
    .submit-btn:hover {
      background-color: #1d4ed8;
    }
  </style>
</head>
<body>
  <div class="contact-form">
    <h1>Contact us</h1>
    <form action="https://api.staticforms.dev/submit" method="POST">
      <input type="hidden" name="apiKey" value="YOUR_API_KEY">
      <input type="hidden" name="redirectTo" value="https://example.com/thank-you.html">
      <input type="hidden" name="subject" value="New message from example.com">

      <div class="form-group">
        <label for="name">Name</label>
        <input type="text" id="name" name="name" class="form-control" autocomplete="name" required>
      </div>

      <div class="form-group">
        <label for="email">Email</label>
        <input type="email" id="email" name="email" class="form-control" autocomplete="email" required>
      </div>

      <div class="form-group">
        <label for="message">Message</label>
        <textarea id="message" name="message" class="form-control" rows="5" required></textarea>
      </div>

      <input type="text" name="honeypot" style="display:none" tabindex="-1" autocomplete="off">

      <button type="submit" class="submit-btn">Send message</button>
    </form>
  </div>
</body>
</html>
And a minimal thank-you.html to go with it:
<!DOCTYPE html>
<html lang="en">
<head>
  <meta charset="UTF-8">
  <meta name="viewport" content="width=device-width, initial-scale=1.0">
  <title>Thanks</title>
</head>
<body>
  <h1>Thanks, your message is on its way.</h1>
  <p><a href="/">Back to the home page</a></p>
</body>
</html>
Troubleshooting
| What you see | Why, and what to do |
|---|---|
| A plain "Form submitted successfully" page | The submission worked. Add redirectTo with a full URL to show your own page. |
| A 404 after submitting | redirectTo points at a page that isn't deployed, or at a GitHub Pages project URL without /REPO/. |
| "Invalid API key" | The apiKey value doesn't match the key on the form's General tab. Check for extra spaces. |
| A 403 that mentions CAPTCHA, Turnstile, hCaptcha or Altcha | A CAPTCHA is on for the form, but the submission had no valid token. Add the widget or turn the CAPTCHA off. |
The console reports a form-action violation |
Your CSP blocks the endpoint. Add https://api.staticforms.dev to form-action. |
| No email arrives | Check your spam folder, then the Inbox in the dashboard. If the submission is listed there, the problem is delivery. |
More fixes are in Common Issues.
Start with the snippet
Copy the form from Step 1, set redirectTo from the per-host table, and run the three-step test on your live URL. The quick start walks through creating the form and finding your key, and getting started with Static Forms covers the rest of the dashboard.
Related Articles
Contact Form on a Static WordPress Site (Simply Static)
Add a contact form to a static WordPress site that survives a Simply Static or WP2Static export: why plugin forms break, the HTML fix and how to test it.
Add a Contact Form to Eleventy Without Writing a Backend
Build an Eleventy contact form that sends email without a server, with a copy-paste Nunjucks template, spam protection, deployment steps, and troubleshooting.
How to Add a Contact Form to Cloudflare Pages
Build and deploy a working Cloudflare Pages contact form with email delivery, spam protection, a thank-you page, and a practical test checklist.